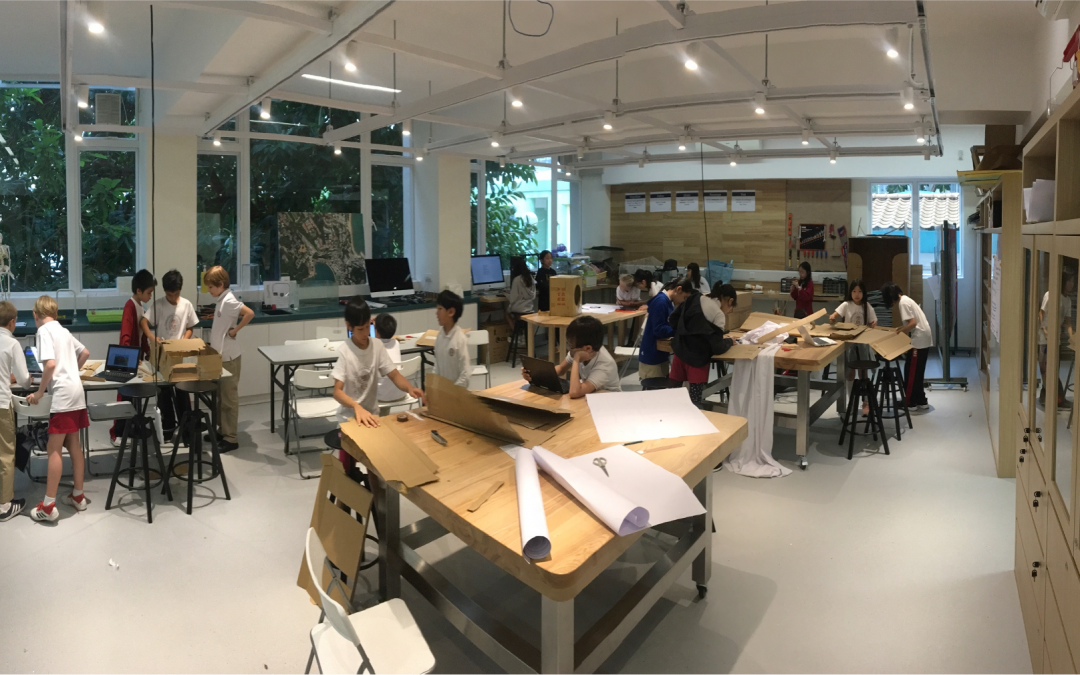
What strikes you about the classroom above?
Perhaps you notice students are grouped together. Materials are spread out throughout the room.
There’s cardboard- lots of it. What’s most striking about this picture for me is that the teacher is hardly noticeable.
If you look closely, you may find her. She’s at the front OBSERVING. Her students are taking center stage.
Creating a student-centered PBL classroom like this certainly takes time.
In a socially distanced environment like the ones we find ourselves in today, it will also require a LOT of creativity.
But it’s still doable. Especially for an innovator like yourself.
Here are 6 key questions as you set up your classroom for the new school year.
#1: How will my room foster collaboration?
Consider how you will set up tables to enhance collaboration. Are they all faced forward? Or will students face other? How you arrange your tables sends a strong message on Day One to students around who owns the space.
#2: How will I exhibit student work?
In my first classroom, I covered every square inch of wall space with posters, processes, and historical visuals. Even though my mom thought it was cute, it sent the wrong message to kids. It was MY space, not theirs. Create a spot in your room to exhibit their work. I have seen classrooms that have been designed like museums- with glass cases enclosing student work, and tv screens for student reflections on the projects they completed.
#3: Will my room have a clearly distinguishable theme?
I’ve seen classrooms designed like Ancient Rome; others, like a ranch in middle America; and some like Hogwarts from Harry Potter. This generates excitement in students from Day One. If you are struggling for ideas, consider your first unit of study, and design the room accordingly.
#4: How will I create spaces for project ‘process’ and ‘product?’
There is a temptation to make our rooms squeaky clean and spot free. And while our rooms might win interior design awards, it doesn’t send the right message to kids. Create clear spaces in the room to demonstrate VISUAL thinking and processes throughout the project. I used to use chalk paint to cover barren walls; or affix dry erase material to make every surface writable.
#5: How accessible will materials/ technology be in my classroom?
Projects require a plethora of materials. Glue guns, cardboard, construction paper, hammers, clamps, etc. How readily available you make these materials will have a direct correlation on how often they are used. Put them in easily slidable bins, or on small roller carts. You can designate each cart to include a different sub-set of materials. Set up a ‘wet’ and ‘dry’ space. ‘Wet spaces’ are for messy project work, and ‘dry spaces’ for cleaner design/research.
#6: Do students really need to sit?
Do you see any students sitting in the picture above? I only see one- and he seems to be the most disengaged. Consider using adjustable stools in your PBL classroom. This makes both sitting and standing easy to achieve.
? BONUS CHALLENGE ?
Let your students design your classroom. Make it your first ‘mini-project.’ Your kiddos will love you forever and you will also gain skill sets needed for DEEPER project dives. Got any of your own questions to consider/ ideas? I would love to hear them, and feature your classroom in our growing PBL community.